Mesure un courant électrique
Mise en œuvre du capteur INA 219
La référence constructeur
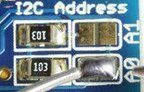
A noter l'usage d'adresses 7 bits en I2C 0x40, 0x41, 0x44, 0x45 sélectionnables par jumpers :
Board 0: Address = 0x40 Offset = binary 00000 (no jumpers required)
Board 1: Address = 0x41 Offset = binary 00001 (bridge A0 as in the photo above)
Board 2: Address = 0x44 Offset = binary 00100 (bridge A1)
Board 3: Address = 0x45 Offset = binary 00101 (bridge A0 & A1)

Télécharger la librairie (Adafruit_INA219) via le gestionnaire de l'arduino
Fichier / Exemples/Adafruit_INA219/getcutrrent
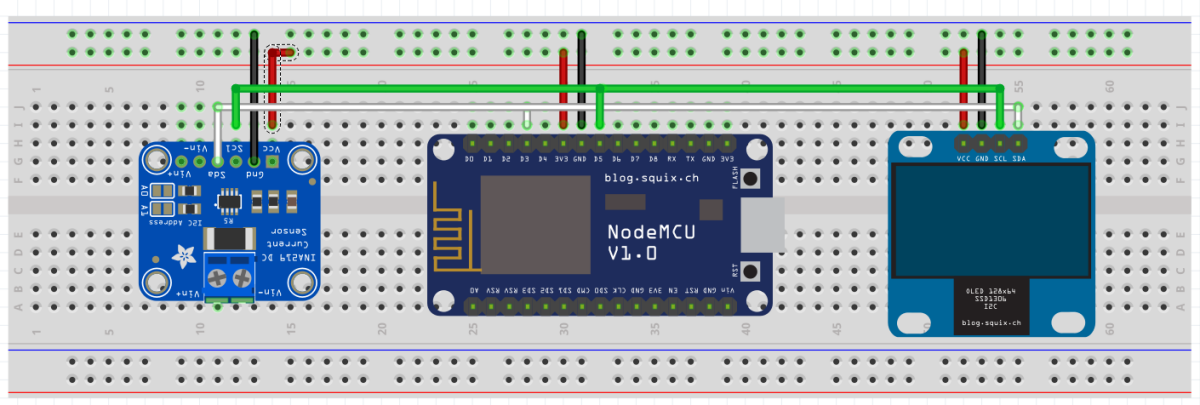
Réaliser les branchements :
Connect GND to GND
Connect VCC to 5v
SDA to SDA (Analog pin 4 on pre-R3 Arduino)
SCL to SCL (Analog pin 5 on pre-R3 Arduino)
La documentation de la librairie
Montage complet avec un esp8266 sur node mmcu
Montage et sortie max
Chaque pin est limitée à 20 mA en sortie
1
/**2
* The MIT License (MIT)3
*4
* Copyright (c) 2018 by ThingPulse, Daniel Eichhorn5
* Copyright (c) 2018 by Fabrice Weinberg6
*7
* Permission is hereby granted, free of charge, to any person obtaining a copy8
* of this software and associated documentation files (the "Software"), to deal9
* in the Software without restriction, including without limitation the rights10
* to use, copy, modify, merge, publish, distribute, sublicense, and/or sell11
* copies of the Software, and to permit persons to whom the Software is12
* furnished to do so, subject to the following conditions:13
*14
* The above copyright notice and this permission notice shall be included in all15
* copies or substantial portions of the Software.16
*17
* THE SOFTWARE IS PROVIDED "AS IS", WITHOUT WARRANTY OF ANY KIND, EXPRESS OR18
* IMPLIED, INCLUDING BUT NOT LIMITED TO THE WARRANTIES OF MERCHANTABILITY,19
* FITNESS FOR A PARTICULAR PURPOSE AND NONINFRINGEMENT. IN NO EVENT SHALL THE20
* AUTHORS OR COPYRIGHT HOLDERS BE LIABLE FOR ANY CLAIM, DAMAGES OR OTHER21
* LIABILITY, WHETHER IN AN ACTION OF CONTRACT, TORT OR OTHERWISE, ARISING FROM,22
* OUT OF OR IN CONNECTION WITH THE SOFTWARE OR THE USE OR OTHER DEALINGS IN THE23
* SOFTWARE.24
*25
* ThingPulse invests considerable time and money to develop these open source libraries.26
* Please support us by buying our products (and not the clones) from27
* https://thingpulse.com28
*29
*/30
31
32
// Pour la connexion I2C avec Wire33
//intaller la bibliothèque 34
// Only needed for Arduino 1.6.5 and earlier
35
// legacy include: `#include "SSD1306.h"`
36
37
38
39
40
Adafruit_INA219 ina219;
41
42
43
44
// Initialize the OLED display using Wire library45
SSD1306Wire display(0x3c, D3, D5);
46
47
48
49
50
51
52
53
54
void setup() {
55
Serial.begin(115200);
56
Serial.println();
57
Serial.println();
58
59
uint32_t currentFrequency;
60
61
62
63
// Initialize the INA219.64
// By default the initialization will use the largest range (32V, 2A). However65
// you can call a setCalibration function to change this range (see comments).66
ina219.begin();
67
68
ina219.setCalibration_16V_400mA();
69
70
71
display.init();
72
73
display.flipScreenVertically();
74
display.clear();
75
76
display.setFont(ArialMT_Plain_24);
77
display.drawString(0, 26, "INA 219");
78
display.display();
79
delay(1000);
80
}
81
82
void drawFontFaceDemo() {
83
// Font Demo184
// create more fonts at http://oleddisplay.squix.ch/85
86
87
88
display.setTextAlignment(TEXT_ALIGN_LEFT);
89
display.setFont(ArialMT_Plain_10);
90
display.drawString(0, 0, "Intensité");
91
// display.setFont(ArialMT_Plain_16);92
// display.drawString(0, 10, "Hello world");93
// display.setFont(ArialMT_Plain_24);94
//display.drawString(0, 26, "Hello world");95
}
96
97
98
99
100
101
102
103
104
105
106
107
long timeSinceLastModeSwitch = 0;
108
109
void loop() {
110
111
float shuntvoltage = 0;
112
float busvoltage = 0;
113
float current_mA = 0;
114
float loadvoltage = 0;
115
float power_mW = 0;
116
117
shuntvoltage = ina219.getShuntVoltage_mV();
118
busvoltage = ina219.getBusVoltage_V();
119
current_mA = ina219.getCurrent_mA();
120
power_mW = ina219.getPower_mW();
121
loadvoltage = busvoltage + (shuntvoltage / 1000);
122
123
Serial.print("Bus Voltage: "); Serial.print(busvoltage); Serial.println(" V");
124
Serial.print("Shunt Voltage: "); Serial.print(shuntvoltage); Serial.println(" mV");
125
Serial.print("Load Voltage: "); Serial.print(loadvoltage); Serial.println(" V");
126
Serial.print("Current: "); Serial.print(current_mA); Serial.println(" mA");
127
Serial.print("Power: "); Serial.print(power_mW); Serial.println(" mW");
128
129
// clear the display130
display.clear();
131
//drawFontFaceDemo();132
133
display.setTextAlignment(TEXT_ALIGN_LEFT);
134
display.setFont(ArialMT_Plain_10);
135
display.drawString(0, 0, "Intensité");
136
display.setFont(ArialMT_Plain_16);
137
//display.drawString(0, 10, "Hello world");138
// display.setFont(ArialMT_Plain_24);139
//display.drawString(0, 26, "Hello world");140
141
142
//display.drawString(0, 26, "INA 219");143
display.drawString(10, 13, String(current_mA));
144
display.drawString(50, 13, "mA");
145
display.setFont(ArialMT_Plain_10);
146
display.drawString(0,26, "bus:");
147
display.setFont(ArialMT_Plain_16);
148
display.drawString(10, 39, String(loadvoltage));
149
display.drawString(50, 39, "mV");
150
// write the buffer to the display151
display.display();
152
153
//if (millis() - timeSinceLastModeSwitch > DEMO_DURATION) {154
155
// timeSinceLastModeSwitch = millis();156
// }157
158
159
delay(1000);
160
}